
Sourdough Brown Bread

Sourdough brown bread made with molasses, honey, and whole wheat flour. A soft, flavorful sandwich loaf with a rich color and tender crumb.

This sourdough brown bread is soft, slightly sweet, and full of rich flavor from molasses, honey, and whole wheat flour. The loaf bakes up with a beautiful dark brown color, a tender crumb, and a soft crust that’s perfect for sandwiches, toast, or enjoying warm with butter.
Don’t let the cocoa powder fool you, this bread doesn’t taste like chocolate. Instead, the cocoa deepens the color and enhances the molasses flavor, creating that classic brown bread taste many of us grew up loving.
Thanks to the sourdough starter, the loaf has a subtle tang that balances the sweetness perfectly. It’s a cozy, everyday bread that feels a little special without being difficult to make.

Why you’ll love this recipe
- Soft and flavorful: Molasses, honey, and whole wheat flour create a rich, slightly sweet loaf.
- Perfect for sandwiches and toast: The tender crumb slices beautifully and stays soft for days.
- A fun twist on everyday sourdough: Familiar enough for beginners but different from a classic white loaf.
If you enjoy hearty sandwich breads like this one, try sourdough English muffin bread for another great breakfast loaf, or sourdough sandwich bread for a classic everyday option. And if you’re looking for something with even more whole grain flavor, German sourdough rye bread makes a wonderful next loaf.
How to make this recipe
Here is a brief overview of the process for this recipe, so you know what to expect when you start baking. For the full set of written directions, please make sure you scroll down to the recipe card below.
Step One: Mix the dough
In a large bowl, whisk together the water and sourdough starter until combined. Add the rest of the wet ingredients and stir until smooth. Mix in the dry ingredients until a dough forms.
Knead for a few minutes until the dough begins to feel smooth. Cover the bowl and let the dough rest for 30 minutes.


Step Two: Stretch and folds
Perform one set of stretch and folds by lifting one side of the dough, stretching it upward, and folding it over itself. Rotate the bowl and repeat on all four sides.
Cover and rest for 30 minutes.
Repeat this process two more times for a total of 3 sets of stretch and folds.


Step Three: Bulk fermentation
Cover the bowl and let the dough rise until it looks puffy and has increased in size by about 50–75%. Depending on the temperature of your kitchen, this usually takes 3½–5½ hours.


Step Four: Shape the loaf
Turn the dough onto a lightly floured surface and gently press it into a rectangle. Roll the dough into a tight log, pinching the seam closed when finished. Place the dough seam-side down into a greased loaf pan.


Step Five: Final Rise
Cover the pan and let the dough rise until the loaf is about 1 inch above the rim of the pan and looks light and puffy. This usually takes 1–2 hours.
Step Six: Baking
Preheat your oven to 350°F.
Brush the top of the loaf lightly with water and sprinkle with oats. Score the center of the loaf with a bread lame or sharp knife. Place a second loaf pan upside down over the dough to trap steam and help create a soft crust.
Bake for 25 minutes. Carefully remove the top pan and continue baking for another 20–25 minutes, until the loaf is deep brown and fully baked.
Remove the bread from the pan and place it on a wire rack. Allow the loaf to cool completely before slicing, at least 2 hours.


Baker’s Schedule
This timeline is designed for a same-day bake. You can also refrigerate the dough overnight after bulk fermentation if you’d like to spread the work over two days.
Day One
- Mixing the dough – 15 minutes
- Resting the dough – 30 minutes
- Stretch and folds – 1½ hours (3 sets spaced 30 minutes apart)
- Bulk fermentation – 3½ to 5½ hours
- Shaping the loaf – 10 minutes
- Final rise – 1 to 2 hours
- Preheating the oven – 20 minutes
- Baking – 45 to 50 minutes
- Cooling time – At least 2 hours before slicing
Overnight option
After bulk fermentation, cover the dough and refrigerate it overnight.
The next day, let the dough sit at room temperature for about 30–60 minutes before shaping. Continue with the final rise and baking as directed.
Remember that the temperature and humidity of your house can affect the timing of sourdough recipes – please watch the dough, not the clock!

Storage
Store the loaf in a bread bag, bread box, or airtight container for 3–4 days.
Freeze tightly wrapped bread for up to 3 months.

Sourdough is better when shared
If you try this recipe, let me know! Leave a comment and rating below.
Love and links are always appreciated! If you’d like to share this recipe, please link to the post directly for the recipe, please do not copy and paste or screenshot. Thank you so much for supporting me. XOXO – Jenni
Sourdough Brown Bread
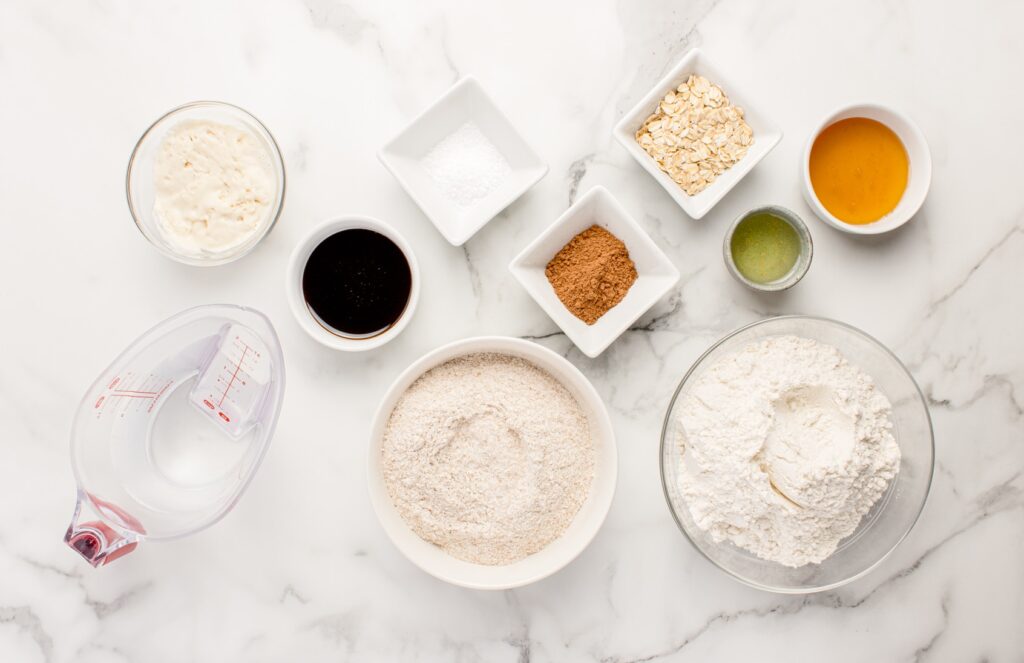
Ingredients
Method
- In a large bowl, whisk together the water and sourdough starter until the starter is evenly dispersed.
- Add the oil, molasses, and honey and then stir until everything is combined.
- Add the all-purpose flour, whole wheat flour, cocoa powder, and salt.
- Mix until a dough forms: Stand Mixer Method: Mix with the dough hook on low speed for 4 to 6 minutes until a smooth dough forms. By Hand: Mix until no dry flour remains, then knead the dough for 2 to 3 minutes until it begins to feel smooth.
- Cover the bowl and let the dough rest for 30 minutes.
- Perform one set of stretch and folds. Lift one side of the dough and then stretch it upward, and fold it over itself. Turn the bowl 90 degrees and repeat the action on all four sides.
- Cover the bowl and let the dough rest for 30 minutes.
- Repeat this two more times, resting the dough for 30 minutes between each set, for a total of 3 sets of stretch and folds.
- After the final stretch and fold, leave the dough covered to continue fermenting. Bulk fermentation is complete when the dough has increased by about 50-75%, and feels noticeably lighter, with small bubbles throughout the surface. I like to aim for a final dough temperature of 75-78°F (24-26°C). In a 72-75°F kitchen, this typically takes 3.5 to 5.5 hours after the stretch-and-fold period is complete.
- Lightly flour your work surface and turn out the dough and gently press it into a rectangle roughly about 9X11 inches.
- Starting with the short side, roll the dough tightly into a log, creating surface tension as you roll.
- Pinch the seam closed and place the dough seam-side down into a lightly greased loaf pan.
- Cover the pan and let the dough rise until the highest point is about 1 inch above the rim of the pan. The dough should look puffy and spring back slowly but not fully when you gently press it. This usually takes 1 to 2 hours.
- Preheat the oven to 350°F (177°C).
- Brush the surface lightly with water. Sprinkle with oats and gently press them into the dough so the oats stick to the dough.
- Using a bread lame or razor blade, score the loaf down the center
- Place a second loaf pan upside down directly over the loaf pan. This traps steam during the first stage of baking, and helps create better oven spring and a softer crust.
- Bake the bread with the top pan in place for 25 minutes and then carefully remove the upper pan and continue baking for 20 to 25 minutes more. The loaf is done when it is deep brown and registers 200-205°F (93-96°C) in the center. You can check the temperature using a meat thermometer.
- Remove the bread from the pan immediately and place it on a wire rack. Allow the loaf to cool completely, at least 2 hours, before slicing and devouring it.
Nutrition
Notes
- Room Temperature: Store your bread in a bread bag, bread box, or airtight container for 3-4 days.
- Freezer: Wrap it tightly and freeze it for up to 3 months.


I tried this, and it was so flavorful and pretty! The kids devoured it. Next time, I’ll try using melted dairy-free butter instead of oil.